
Project Creation – Unity Plugin
Rapport’s new project creation workflow for Unity Plugin applications simplifies setup and gives you full control over key components like character voice, and AI behavior.
Character Setup
Contact us to set up a custom character, or select from the provided options. You can set up and configure your character’s behavior on the Rapport website https://www.rapport.cloud/
Important Limitation: Please ensure that all character blendshapes have unique names, regardless of their prefix. Multiple instances of an identical blendshape name with varying prefixes (e.g., both morpher.JawOpen and blendshape.JawOpen) will cause conflicts and are not supported.
Step-by-Step Setup in Rapport Studio
Step 1 – Create Your Workspace
Your workspace is the home for your projects and assets. If you haven’t created one yet, go to your dashboard and click Create Workspace.
Step 2 – Start a New Project
Inside your workspace, click the large Create New Project button.
Step 3 – Choose Application Type: Unity Plugin
Select Unity Plugin as the application type to start a project designed for integration with the Unity Engine.
Step 4 – Project Setup
The left-hand menu (see the Quick Start Guide) will now guide you through all the necessary configuration options:
-
Project Setup – Give your project a name and choose a starting template.
-
Character Config – Select the model rig type for your project (e.g., Metahuman).
-
Language – Choose the language your character will speak.
-
Voice – Choose from TTS providers and preview how your character will sound.
-
AI – Select the AI model and optionally customise the behaviour using prompts or advanced fields.
✅ Once all required fields are configured, your session preview will begin automatically.
Save and Integrate (Unity)
When your configuration is complete:
-
Click Save and Integrate to publish the project
-
This unlocks Deploy Token Management
-
You’ll also see the instructional video on plugin setup
Deploy Token Management
The Rapport Unity Plugin connects your Unity Engine project with the Rapport platform—enabling lifelike, voice-driven character interactions powered by Rapport’s AI and animation systems.
To authenticate and connect the two environments, you’ll need to generate a Deploy Token.
What Are Deploy Tokens?
Deploy Tokens link your published Rapport project to your Unity project. Only active and valid tokens can be used in the Rapport Unity Viewer Plugin.
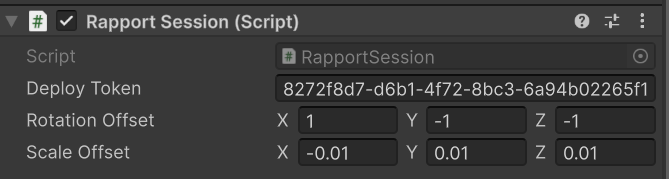
You can also set the rotation and scale offsets between the web version of the character and how its represented in unity.
How to Manage Deploy Tokens
After clicking Save and Integrate, navigate to the Integration section:
-
Create a New Token
-
Enter a name
-
Optionally set an expiration date
-
Click Create New Token
-
-
Delete or Deactivate Tokens
-
Remove tokens you no longer use
-
Only active tokens are displayed in the plugin
-
-
Set Expiry Dates
-
Define how long a token should remain active
-
Useful for temporary access or time-boxed deployments
-